Showing posts with label compositing. Show all posts

Thursday, January 15, 2009

VFX Tip #3 - Compositing Fog or Mist

Compositing fog elements seems like a pretty straightforward thing to do in After Effects. Shoot or render your fog element against black, and then Add or Screen it on top of your footage, right? Wrong. This method is incorrect. Let's go over why.

The Add transfer mode should only be used when compositing light passes, or something that is made up of light, such as fire, lasers, or lens flares. However, fog, as we know, is not made up of light, but rather tiny particles of moisture suspended in the air. They may reflect, refract, and diffuse light, but they do not emit it. Therefore, we must not composite fog elements with Add or Screen because it is an incorrect representation of real life. This holds true of smoke elements as well.

On a simple compositing level, fog elements should occlude their background plate, not Add to it. The following is a technique I use for compositing fog elements into background plates using After Effects. This method can apply to other compositing programs as well, so if you use Shake, Combustion, Nuke, Fusion, or other such program, please continue to read on.

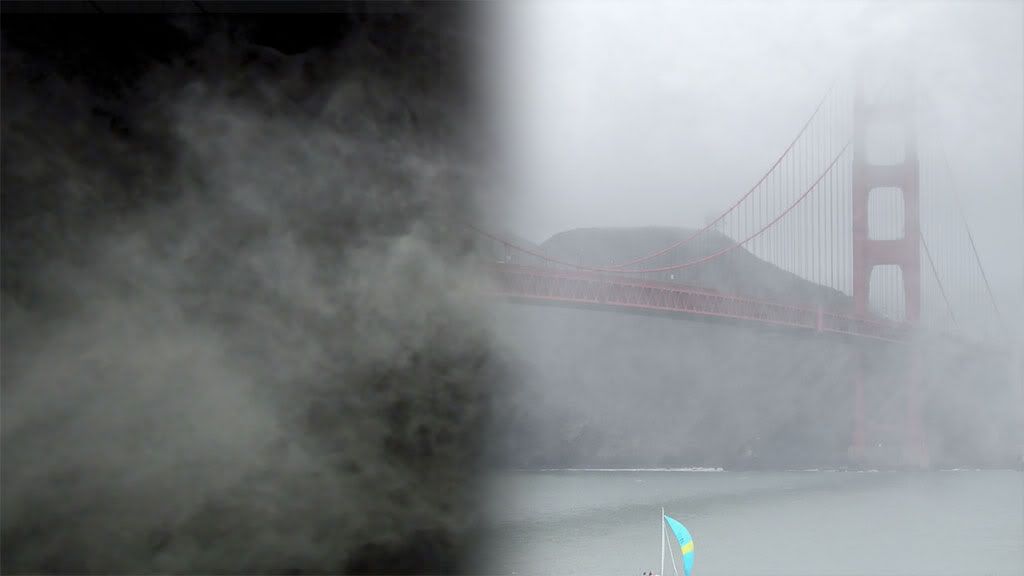
First, let's look at our original background plate...

Click To Enlarge

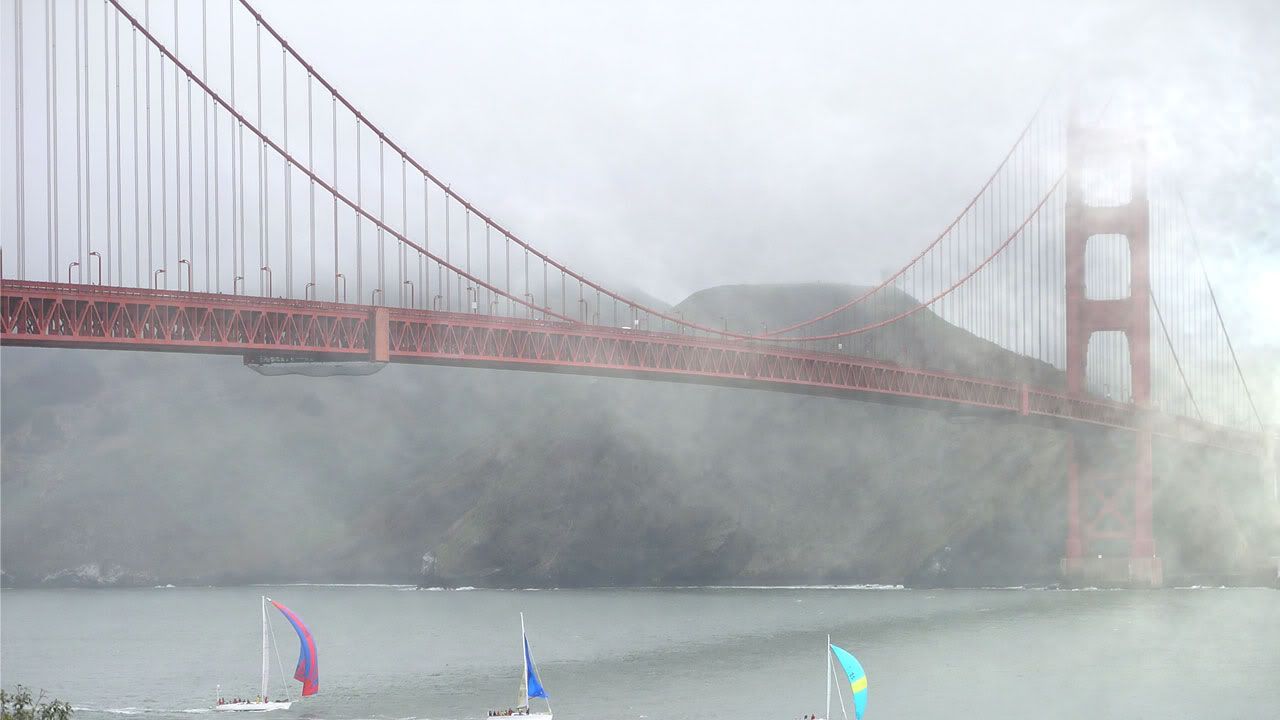
As you can see, this image provides a good reference for a starting point to add more fog. Notice how the fog completely obsures the top of the bridge tower. The fog is not see through as an Add operation would be. Now, let's take a look at our fog element...

Click To Enlarge

I purchased this fog element from http://www.detfilmshd.com/, which is a great resource for low cost elements that composite nicely into VFX shots. I highly recommend them. If you do not have a filmed element of fog, Fractal Noise or Turbulent Noise can be used as a decent substitute.

Now, we can't just put this element over the background plate using Add, because we get this result...

Click To Enlarge

That doesn't look very natural when we compare it with our original plate. It's blowing out the bridge details and the sky, because it seems to be adding light. This is not what we are going for. Remember, we want occlusion, not addition.

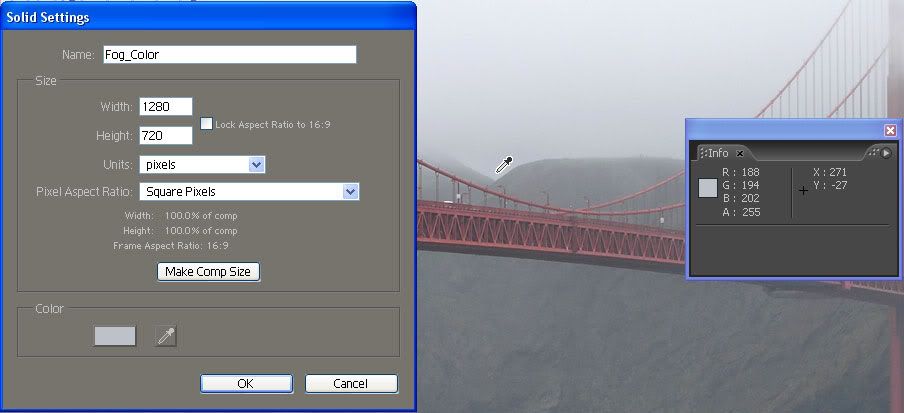
A better alternative, is to create a new soild layer, and use the color eyedropper tool to select an appropriate gray color to use for our fog. I generally try to use a color near the horizon.

Click To Enlarge

Now all we have to do, is use the fog footage's luminance as a mask on the new gray solid we just created. To do this, simply layer the fog element footage over the solid, and set the solid's track matte to "Luma Matte." That's all their is to it. Your composite will now look much more natural.

Click To Enlarge

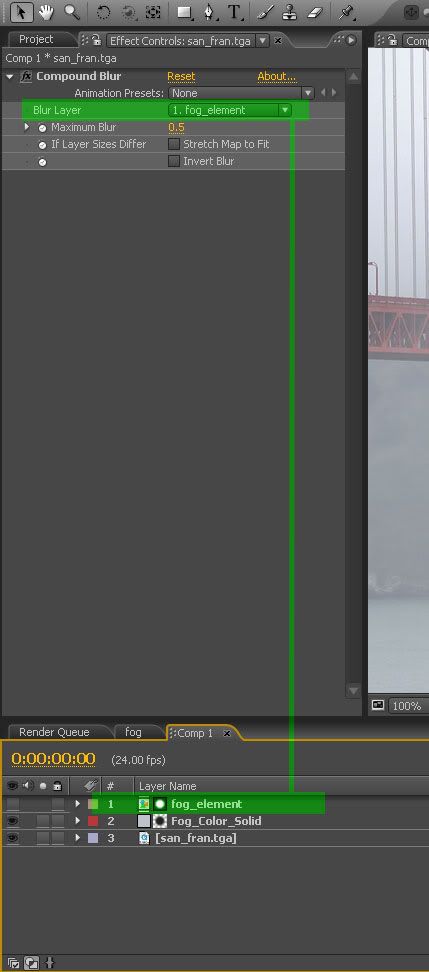
Finally, we can add one more last touch to this composite. Select your background plate layer (in this case, the bridge) and add a Compound Blur. This will look strange at first, so we need to make a couple of adjustments. Set to Blur layer in the Compound Blur controls menu to be the fog footage element. This will use the fog element's luminance as a mask for blurring the background plate. This simulates the way fog in the real world diffracts light behind it. The blur by default, though, will be 20, which is too high for fog, so set it to be around 0.5-1.0.

Click To Enlarge

A little extra work than using transfer modes to be sure, but it will greatly help the realism of your shots. And here is our finished composite...

Click To Enlarge

Tuesday, December 16, 2008

Car Shader Tests

So, this is my first attempt at doing a photorealisitc studio car rendering. I used mental ray for 3ds max for this image. The car is using shaders from the Arch & Design materials, as well as a Car Paint material build with mental ray.

A little post work, such as film grain and softening, and I think it's starting to take on a realistic appearance.

Click to view full resolution image


Click to view full resolution image


Monday, July 14, 2008

OpenEXR


I'm very late jumping onto the bandwagon of OpenEXR, or the .EXR format for images. My recent conversion to a completely linear workflow has coaxed me into making the jump. I must say however, that I wish I had been using EXR ever since it came out to the public.

For those of you who don't know, EXR is a image format written at Industrial Light and Magic for storing scanned film images or renders. It is a very sophisticated format, allowing you many options for compression, bit depths, and the ability to store high dynamic range values.

I won't go into all the technical information, but just a couple of suggestions I learned.


1.When storing a render without film grain , compress using ZIP lossless compression.

2. When storing a scanned film frame, or digital video with noise, compress using PIZ lossless compression.


For more techinical details on EXR, see these two sites...

http://www.openexr.com/

http://en.wikipedia.org/wiki/Openexr


The main reason for me posting this entry is this: USE EXR, IT ROCKS.

Friday, May 2, 2008

VFX Tip #2 - Lightwrap: Less is More

Light wrapping is a useful technique for making a blue/greenscreen subject or CG object really set in the background it is being composited into. It creates the illusion of the light from the background plate appear to bleed over the foreground, which helps the element blend naturally with its background.

However, this technique should be used subtly. A common mistake I see often in composites is using too much lightwrap. If you just leave the lightwrap effects at 100% opacity, most of the time, it will be too much. In fact, I try not to go above about 50% opacity. Look at the example below to see what I mean.

Click to Enlarge

Clearly, the default 100% is far too much lightwrap, which looks unnatural, and gives away the composite. However, on the right, the lightwrap is only at 25% and feels far more natural.

Monday, April 7, 2008

VFX Tip #1 - Hunk Of Burning Love

No, I'm not the hunk of burning love. However, you may love me after this easy tip. In addition, you'll most certainly love the power of blending fire elements using 1.0 gamma.

This is the first of what I hope to be a continued series of visual effects tips. Sometimes they will be quick tips, and sometimes a bit more involved.

For my first tip, I thought I would share the benefits of compositing using a gamma blending of 1.0 in Adobe After Effects. Without going into a detailed explanation, blending with a gamma of 1.0 allows a more natural looking blend of light inside of a composite. This is especially true of elements shot against black such as fire or explosions.

In After Effects, you can enable 1.0 gamma blending by going to File>Project Settings and put a check mark next to "Blend Colors Using 1.0 Gamma." Below is an image example. All settings are identical, except for the gamma blending change. Both fire elements are composited using the "Add" transfer mode.


Click to Enlarge

Notice how the fire on the left is quite blown out, and has lost much of it's orange color, which was in the original plate. After enabling blending, you can see on the right that it sets in the in the image much nicer, and looks far more natural. Well, as natural as burning stone can look, anyway. There is also a noticeable difference in the cast lighting that I faked on the ground under the fire.

Also keep in mind, that this can also be useful for energy effects, such as sparks, lightning, lasers, or even lightsaber blades.

I hope this little tip was helpful. Stay tuned for more.